This post covers how to install Android Studio on a Windows 7 guest on VirtualBox. I’ve incorporated the virtual machine element because Android Studio updates may get problematic, and rolling back to a previous step during installation when failures occur is much faster than troubleshooting, or worst-case scenario, starting installation from scratch.
I recommend taking a virtual machine snapshot at the end of each step to prevent headaches.
Step 1. Install VirtualBox and the VirtualBox Extension Pack
https://www.virtualbox.org/wiki/Downloads
It is very important that the version number for VirtualBox and the Extension Pack are the same (or close enough). Check for compatibility on the Virtualbox site e.g. VirtualBox-4.3.20-96997-Win.exe and Oracle_VM_VirtualBox_Extension_Pack-4.3.20-96996.vbox-extpack.
The extension connects the virtual machine to the host-connected Android device. To install the extension from VirtualBox, go to File > Settings > Extensions > then click the Add package button.

Create a virtual machine in VirtualBox with Windows 7 64-bit, over 40GB space, and over 6GB RAM. Then install the Oracle Guest Additions by clicking Devices > Insert Guest Additions CD image…

If the executable doesn’t automatically start, just check the VM’s disk drive.

Step 2. Install the latest Java Development Kit
http://www.oracle.com/technetwork/java/javase/downloads/index-jsp-138363.html

It is very important to match the installer (whether x86 or x64) to your system.
Do not attempt to install JDK x86 on Windows x64. I did this with an earlier version of Android Studio and it failed to run properly.
Create a new environment system variable named JAVA_HOME and set its path for the JDK e.g. C:\Program Files\Java\jdk1.8.0_40.

Step 3. Install Android Studio
https://developer.android.com/sdk/index.html#top

Make sure to be logged in using an Administrator account before running the installer. During the installation, do not set the Android SDK Location to anything other than the default i.e. leave it as C:\Users\AdministrativeUserAccount\AppData\Local\Android\sdk. Attempting to change this to a directory like C:\sdk\ will cause the application to fail.

Ensure your host and guest PCs are connected to the Internet before running Android Studio for the first time or proceeding with the next step, otherwise the following “Unable to access Android SDK add-on list error will appear.

Step 4. Run Android Studio and install APIs
When running Android Studio for the first time, it will connect to the Internet and run Android SDK Manager. I personally recommend not installing the most recent API, as this tends to be beta and may force you to do a bit of tinkering.
Install the API that matches or is above your Android device’s build.
Be careful with the tick boxes because ticking those already indicated with “Installed” status will remove them.

Step 5. Create a new Android Studio project
Just follow through using the defaults.

If Windows Security Alerts appear, simply untick the boxes or click Cancel.


Depending on your VMs processing speed, the rendering and indexing may take several minutes.


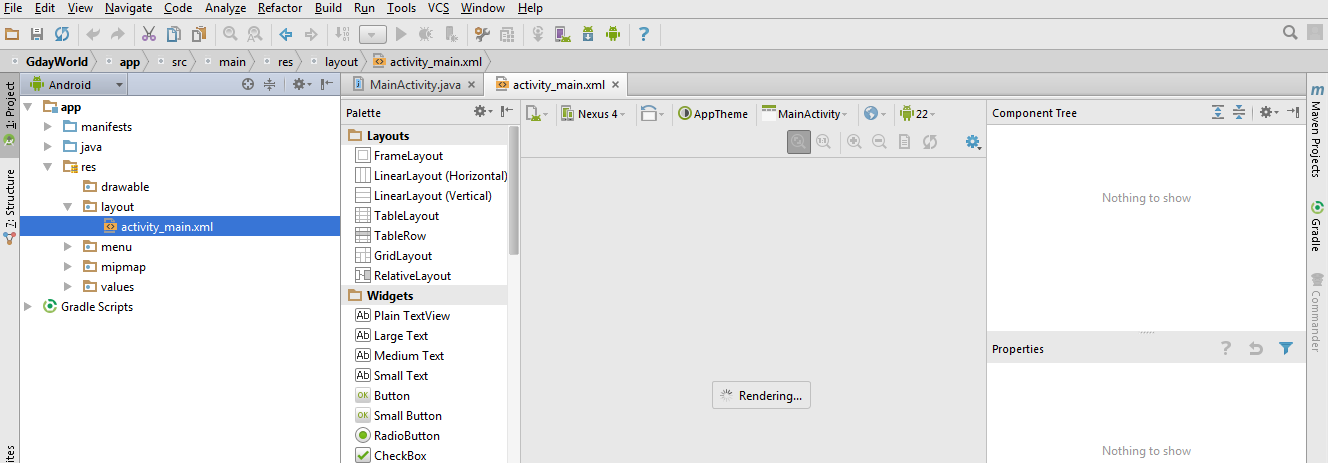
The Android Studio interface should appear similar to this when ready:

As a side note, I tried installing API 22 in the previous step, but it produced the following errors after creating a new project.
Problem 1: When trying to open activity_main.xml, the preview panel fails to load and returns the error: “Rendering Problems Exception raised during rendering: action_bar”

Problem 2: The following classes could not be instantiated;
– android.support.v7.widget.Toolbar
– android.support.v7.internal.widget.ActionBarContextView

To solve Problem 2, I just restarted Android Studio, but for Problem 1, I rolled back my virtual machine and chose not to install API 22. Though I imagine the problem will be resolved in future updates.
Step 6. Test guest OS connection to USB host-connected Android device
Connect the Android device to the host PC. While the virtual machine is running, go to Machine > Settings > USB > then click the USB icon with the green cross.

Take note that the guest OS will always attempt to find the device on the same USB port you have it connected to using this option.

Click the Android device and it will appear on the USB Device Filters list.

If the guest OS does not detect the Android device, shut down the VM and turn it back on. Log into the guest OS, then pull out and plug back in the Android device, making sure that the device’s screen is unlocked. You should now be able to view the devices contents via the guest OS Windows Explorer.

Step 7. Set up Android device for USB debugging
From your device, go to Settings > About phone > then tap Build number 7 times. Turn on Developer options and turn on USB debugging.
Step 8. Install device’s USB driver to test apps on
For a full list of OEMs, go to http://developer.android.com/tools/device.html. The drivers are expected to be executables that install files into your C:\Program Files folder.
Double-check that your device driver was properly installed by going to Device Manager. If the device is listed under Other Devices, the driver did not install successfully. If the device appears under Universal Serial Bus Controllers, the installation was successful.
Step 9. Open the HelloWorld project in Android Studio
Unplug then replug the Android device. A prompt should appear on the device: “Allow USB debugging”, then click OK on the device.
Open the Android Device Monitor (Android-shaped icon beside the help icon) and the device will appear as “Online”.

Click the green play button to run the app.

A prompt will appear, click Choose a running device and select your device, then click OK.

Congratulations, hopefully you now have the HelloWorld app running on your device.